

Don’t know where to start with setting up a bullet journal for beginners?
You’re in the right spot. I just recently (like 5 months ago) started a bullet journal (or “bujo”) so I’m a beginner too. And I’m convinced that I’ve found the easiest place to start.
I’ve managed to keep my planning routine going, stay productive, and basically just get sh*t done. I’ve accomplished so many goals over the past 5 months – including paying off ALL of my credit card debt! – and I’m convinced this system is how I did it.
If you are someone who wants to try to bujo but don’t know where to start, this step-by-step guide to bullet journal for beginners is for you!
I use a hybrid version of traditional dated planners and bullet journals which is why it’s easy for beginners. If you can use a dated planner, you can bullet journal.
If you want to see the video outlining the process, check it out here.
But if you want the written version, I got you! Just keep reading.
Tools You’ll Need:
To get started, you’ll need three very important things (and I’ve linked to my favorites).
1 – A pen. (Full transparency, this is an affiliate link)
2- A dated planner. (Now it’s dated, so make sure you’re buying the correct dates)
Setting Yearly Goals:
Yes, it’s a brand new year and we all want to set goals for the year. It’s necessary but it can be overwhelming for a newbie. Half of the time, most of us can’t even decide what we want for dinner, let alone where we want to be in a year’s time.
But, trust me on this one. It’s worth thinking about if you want to be productive and accomplish goals. Even more important if you plan to track goal progress in your bullet journal.
To make the process less daunting, I choose to set out goal areas for the year instead of goals themselves. For example, I know I want to make progress towards my financial, health, and YouTube channel goals. Those are the “goal areas” and that’s enough to do my version of planning. I do sometimes go deeper and chunk them out into more concrete goals. But if you’re feeling overwhelmed with where to start, just identify the areas you want to focus on.
The “Monthly Spread” In Your Bullet Journal For Beginners:
When I was first starting bullet journaling, this is one of the parts that tripped me up the most. See, I studied graphic design in college and we had to take studio art classes. Ironically, the creative parts of bullet journaling (which are the parts I enjoy the most) are also the part that gives me the most anxiety. I don’t want to mess up my notebook. If I change my mind in the design that I want, I won’t be able to rip the page out like I can in a sketch book. Spoiler alert* you totally can do that if you want to. But I have imposed this imaginary rule on myself, so here we are.
To get around this, I choose to make just a small part of it creative. That way, I don’t have to worry about doing an elaborate spread.
First half of the monthly spread.
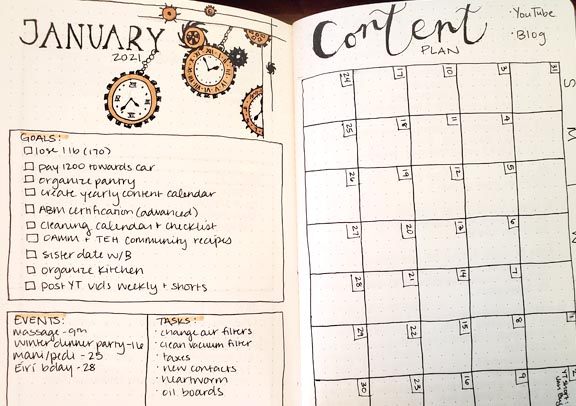
I really always use the same template on both sides of the spread. I hand-letter the month and do a seasonal design either in the background or as part of the hand-lettering. Then underneath that, I put three boxes. One large box that takes up the width of the entire page. And two smaller boxes side by side underneath the larger one.
In the first box, I title it “goals” and there is where I take my yearly areas of focus and break them down into 10 goals that I want to accomplish for the month. Sometimes they’re large goals, sometimes small. They can be whatever you want them to be. The only rule is they have to be meaningful or impactful to you in some way.
An example, for January, one of my goals is to lose 1 pound. That doesn’t sound like a lot and I do have more than just 1 pound I’d like to lose. But I also am trying to do this in a healthy, long-lasting way. So 1-2 pounds a month is a good goal. It’s small, but meaningful to me.
I also have “organize my kitchen” as a January goal – which, let me tell you, is not a small feat! I have procrastinated on this for over a year. So, it’s impactful and it’s just time I get it done.
In the bottom two boxes, I have “events” (or dated appointments or special events) and “tasks”. Tasks are things like rotate my mattress or change my toothbrush. Things that have to be done that month but don’t have an assigned date on them. They are not to be confused with goals which are a nice to get done. No, no. These are things that absolutely have to be done at some point.
This set up helps me keep my goals front and center, prioritize to-dos, and keep important dates at an easy glance.
Second half of the monthly spread.
On the other half of the monthly spread, I draw out a calendar and use that to plot my blog and YouTube content for the month.
Obviously, something like this might not be useful for everyone so if it isn’t for you, change it. You can draw a calendar and use it to list out your important dates from the first half of the spread. Or you could use it as a gratitude journal and write one thing you’re grateful for each day.
The possibilities are endless – but don’t let that scare you. Just track something there. The good news is, if you don’t like it or use it, you can always switch it up the next month!
The “Weekly Spread” In Your Bullet Journal For Beginners.
This is another area that tripped me up when I first started. And again it was because of my love and yet anxiety of putting pen to paper and drawing.
I just had no idea what to do for weekly spreads.
I went to Pinterest and Instagram for inspiration and there are zillions. Ranging from elaborate (oh, hello anxiety) to super simple. At first, I thought simple was the way to go. But that didn’t please my creative heart enough and just felt plain and boring.
So then I swung in the opposite direction and went semi-elaborate. But like before, I was afraid to make a mistake and found that I wasn’t drawing weekly spreads enough for it to actually be useful.
I needed something that was functional and also aesthetically pleasing.
So I went with a dated planner that I found “pretty” lol. Yes this means I had to have two books (a dot grid journal and a dated planner) but I’m okay with that.
There was no training needed on this, no anxiety, no thinking, just filling in the appointments when I did my weekly planning on Sunday nights.
Bada-bing, bada-boom. Done.
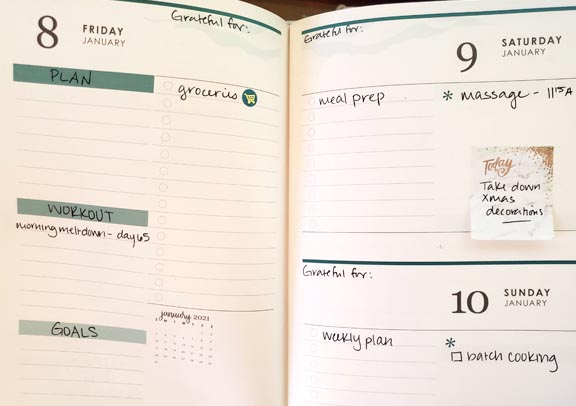
Now, you could stop there if you wanted to and call it a day. Instead, I took it a step further and picked a planner that was dated but still had empty space to allow me to be creative and split up the days as I saw fit.
There were three sections with blank headlines. Some people split that into “morning”, “afternoon”, and “evening” which I tried for awhile but found it didn’t work for me. Then I tried “appointments”, “meals” and “workout” but that also wasn’t quite what I was looking for. I finally landed on something that combines my functional need of a planner, with my ambitious need of wanting to keep on top of my goals.
For me, titling my top section “plan” is the most useful and this is where I have my plan for the day. I usually capture what time my first meeting of the day is, what time I get off work for the day, and then if I need to run an errand during lunch, or have an appointment or something, that goes in there too. It’s literally, a general plan for the day.
The middle section is where I put my workout for the day. Nothing special or creative about that. Just what I plan to do and if I need any special equipment or want to remember to do something different that day. Also, I will use it to write motivational messages to myself if I find I’ve been half-assing my workouts lately.
I use the last section to state my “goals” for the day.. This section goes into more detail in the “daily spread” section below but essentially, these are the top things I want to accomplish for the day.
The planner I selected also has a section specifically for to-dos and I do, in fact, use it for my to-dos. SOOOO unique, I know. lol.
The “Daily Spread” In Your Bullet Journal For Beginners
Now, here is where most of the aesthetics went out the window for me and I went all in on functionality.
I use my daily spread not to track appointments for the day, tasks or workouts that day, etc because I’m tracking that in my weekly planner. Instead, I use the daily spread for two reasons and only two reasons.
1 – Making sure I’m making progress on my goals
2 – A running master list of all to-do’s (that don’t have a specific date assigned to them)
I do a process called “The Daily Grind” mixed with the “Max 5” which are two approaches to daily productivity that unfortunately, I didn’t come up with myself. I wish I had, I would be so proud. Two different YouTubers I subscribe to came up with these. If you watch my video, the videos of theirs are linked in the description box.
The daily grind.
Remember those 10 goals that you listed in your monthly spread? They come back into play in your daily spread. If you’re serious about productivity and getting sh*t done, don’t skip this part. Seriously.
First thing in the morning, before I do anything else (well, after I’ve brushed my teeth and things like that) I do my daily grind. I start by writing the ten monthly goals. By hand. Yes, every single day. And you do it from memory, and not referring back to the day before.
“That sounds ludicrous Lindsay, why would you do that?”
Because. If you can’t remember it, it’s probably not that important and there’s a more impactful or meaningful goal you can go after. At the very least, it doesn’t deserve your attention for that day.
So you write out your ten monthly goals, and then you immediately look at how you’re going to make progress towards those goals today by using the “Max 5” method.
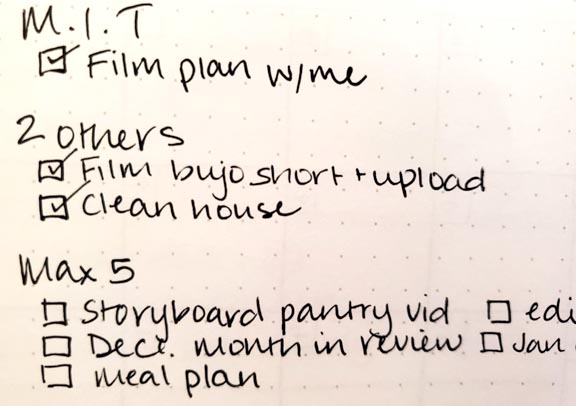
Max 5.
Maybe you’ve heard of “M.I.Ts” or “most important things” before. A few resources I read/watch/listen to say to pick 3 M.I.Ts for the day.
That does completely work so if you want to do it that way, go for it.
But the Max 5 approach makes more sense to me.
You start with your NUMBER ONE absolute most important thing to do that day. It’s the one thing that moves the needle on your goals.
Maybe it’s purchase the domain (if your goal is to finally launch your blog) or review your budget, if your goal is to put extra money in savings this month). It’s the little bite that you’re going to take out of your monthly goal in order to make progress towards your goals every day.
Once you have that written down, you write down “Two Others” and list your two other M.I.Ts. They also move the needle on your goals but for whatever reason (scheduling, priority, motivation) they just aren’t your number one thing to work on that day.
For me, this usually looks like filming or editing a video. If it’s a day where I have a lot of Zoom meetings, I know that I probably won’t be super excited to sit in front of my computer screen for hours editing a video. It’s important for me to do in order to reach my YouTube channel goals, but today it just might not be realistic.
Underneath that list, you then capture your “Max 5”. This is a list of 5 smaller to-dos that have to get done that day but aren’t your M.I.Ts. Things like “groceries” or “clean house” usually get put here. Also things like “purchase gift” or “Call mom” 🙂 The trick with this one though is you can only list 5 things. (Max 5, get it?). If you list more than 5, you’re likely going to either run out of time to get everything done or you’ll spend more time focusing on your little to-dos instead of the big needle moving tasks that will move you towards your goals.
Finally, you have a running to-do list brain dump of everything that needs to get done, but doesn’t have a date attached to it and didn’t make the cut of large or small things that you want to accomplish today. This also gets rewritten day after day. Why? I get tired of rewriting it and it encourages me to actually cross things off of my to-do list. Either because I did it, or because I decided it wasn’t really that important after all and it wasn’t worth the effort of writing it out every day. This keeps me from having a “master to-do list” that is a zillion pages long that never gets put into the to-do list rotation.
But isn’t that a lot of work?
It does sound like it. And when the first day of the year and month happen to fall on a Monday (so you end up having to do all of the above in a single day) it is a lot of work.
But usually, you’re only doing the daily grind. So you’re writing out 10 goals, 8 to-dos for the day, and a master list of other to-do’s you need to do. In my case, there are 11 tasks on my master list today. And that’s it. After that’s done, I’m done for the day.
Look, just give a try for a month and see how you feel. See how you’re progressing towards your goals. If productivity and making progress is your thing, you’re going to love this method.
You can always adjust, adapt, and change things as you go along. Your bullet journal is yours. You can do whatever you want with it.
And you can ALWAYS rip out a page if you change your mind.


No Comments